DRAWINGS
A large part of this project, besides the research, is
putting it all together on paper. As far as I know (and I don't know everything)
there are no definative, authenic, reliable plans that we can really trust. I know,
in a few months from now, or maybe a year, someone will say, hey, I've got this
original plan laying here in my basement or attic, or some other source that is
totally useless unless you bring it forward! Give it to the museum, publish it,
something! As far as I know nothing like that exists. What does exist is sketchy.
Sometimes even in error. Or at least seems so. Here's the problem.
No doubt the D&RGW had a plan. Nice elevations, detail
drawings, everything the construction crew needed to know to build the thing. I am
of the opinion that it was a standard plan due to it's likeness to Gunnison, but
perhaps I am over-applying the term "standard" as the baby Grande only had a few
roundhouses. We see similar construction. Chama and Salida had similar elements
but different that this. Of course this makes sense as they were coming out of the
same engineering department. At any rate, there was a plan, now long lost (or hiding
somewhere). Okay, I did not make direct inquires everywhere I could think of. I was
anxious to get the project underway! I did have a copy of Mike Blazek's plans,
both for Durango and Gunnison. However, a word of caution there. Mike's plans are
based on what he was able to piece together at the time, again, with only loose
information, a handful of photos and perhaps some field measurements if available.
There are some major mistakes, at least on the HO scale plan I had of Gunnison.
The sidewall measures 84 feet while we learned the actual measurement was 67 ft.
This measurement is found on an original D&RGW drawing in the John Maxwell
collection showing the 1931 (or 1937?, the edge of the page is gone) roof-raising
and stall extentions. Arthur Mitchell also shared some plans he's done of Durango
1945-71 which have been fairly helpful.
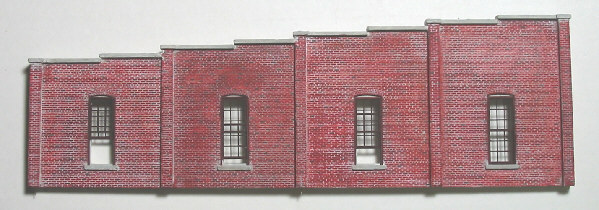
This gets us to my next point. Era. The roundhouse was
built in the 1890's. The harsh conditions wore on it quickly as well as the
changing needs of the railroad. The Farmington branch breifly brought standard
gauge engines into the roundhouse. Stalls four through seven were modified, the
engine doors were made larger. Stalls four, five and six were lengthened. It wasn't
until the 1960's that the roof was raised. Meanwhile, the nice brick walls were
worn down and crudely patched with mortar. Man doors were added to some of the
engine doors. Windows were boarded up. Doors completely rebuilt. Every photo is
different. And again, there is no clear record of what happened when. And I'm
supposed to build a model of this. And drawings.
After spending all winter figuring these things out to
the point where I could finally make the wall patterns I spent the spring (2006)
making molds and castings, and putting it together from my notes. Keep in mind
we are doubling everything (though some elements are common) with my friend Glenn
constructing Gunnison while I'm doing Durango. Okay, so there are 10 stalls, plus
his eleven, each one is different. Sometimes the left engine door is completely
different from the right, beside being a mirrored image, I mean completely different.
Of course that's what makes the model so great. You just keep scratching your head
wondering what in the heck they were doing. The photos clearly show they did.
Okay, so I've got Glenn going on Gunnison. I sort of know
what he's doing 'cause I did it in S-scale a few years ago. I'm working on Durnago.
It would be so much easier if we were just doing this for ourselves. The story
would soon end here. We figured it out and did it, and not have to explain it to
anyone else. But we do, or at least I do. I'm turning this into a kit. Thankfully,
Glenn understands and is helping me out. He's not bailed out. And besides feeding
the information back to me he plans to write an article for the Gazette. But the
next step is to compile all the information into my own drawings.
I've always been a pin and ink draftsman. Way way back I
used to draw ink on vellum. You don't dare make a mistake! You are screwed if you
do. It's nearly impossible to erase. You have to be driven (lucky and nuts) to
complete a drawing. Ink on mylar allows mistakes to be corrected, still it's a
game not to make mistakes. Especially not big ones on big drawings. Thankfully,
those days are in the past. We're working on the computer. Wait a minute, I hate
the computer. I spend way too much time on them already. Now you're taking one of
my pleasures (I really do like to draw) and making me push and click it. I'm not
sure about this. I'm still not sure about this.
We are using CorelDraw to run the laser. Some of you
might say AutoCAD or another program is better and that's fine, it probably is.
CorelDraw on the otherhand is perfectly good for what we are doing. I've learned
how to use it with the laser so we are ahead on the learning curve for drawings.
One of my complaints (yeah, I like to complain) about computer drawings is the
sometimes crappy output. You even see some of published in the magazines which I
just don't get. They'd never publish an ink drawing that looked like that, stepped
curves, weak or improper line weight, no shadowing. Somehow the quality threshold
has been lowered when we went digital. Anyone with a computer thinks he's a
draftsman. Ah, you're right, it's just a dumb hobby. Okay, I'll lay off. My point
is with a little more effort we can produce a high quality drawing on the computer
that is every bit as good as I could do on the drafting table. Good thing too as
the drafting table is currently occupied by a 4 foot by 4 foot roundhouse model!
Just like any other tool, or group of tools, we can push
them to the best of our ability. CorelDraw allows you to go way beyond what you
could do on paper. You really have complete control if you take it. One major item
is the ability to zoom in on a certain point. I don't know what the maximum is,
16,500% or something like that. It's rediculas. It's like working with a microscope
on paper. I cam place or move a point or end of a line exactly where I want it.
You can also place those numerically at an X-Y point down the three dismals. You
also have a full choice of line weight. And styles for that matter. Dotted lines,
dashes, dit-dots, whatever you want. Fills and even colors. It's all there. I'm
just self-taught without even a book so you can imagine if you took a course on
this.
Another valuable trick is to use layers, for instance,
on the floor plan. If I were doing this on paper (mylar) I'd either draw this
several times or as a composite, illustrating the following elements on one page
or several: general layout (radiating out from the turntable center, track and
stall center lines, engine door and rear wall locations); inspection pits; walls;
trusses; roof (rafters); roof (finished). On the computer I built these all in
one file, but on different layers, each of which can be toggled off and on, for
viewing and printing. This assures me that all are lined up properly.
Of course cut and paste is probably the biggest trick of
all. Instead of having to draw the same roof section over and over agian for each
stall all I have to do it draw one very carefully, copy and paste it into the next.
Same thing for the engine doows, windows and so on. Amazing how much time is saved.
And wasted. Yeah, wasted. I'm still spending hours and hours on these darn drawings.
And one mistake as I said cut and pasted, thought many generations. If it's wrong,
boy, are we in trouble. I'm forever chasing things around. I hope I've got the
correct information coralled. We'll see. I've been working on them for months.
Day after day. My arm is falling off. We're now into 2007, the project is behind
by five months. Yikes.
Next section:
2006 Durango Narrow Gauge Convention
|
 O List Top