COLORING THE HYDROCAL WALLS

Delta Ceramcoat comes in all colors.
My traditional method for coloring the Hydrocal castings as
explained in my Crow's How 2
section of the web site. These start by sealing the castings (after you have done
all the cutting and fitting) and then use Floquil paints and stains. Since the
stains have been discontinued and my supply is just about out I thought it was
time to seriously look for alternatives. I'd tired acrylics (Polly-Scale) in the
past but always felt the Floquil's looked better. Now that a one ounce bottle
of Floquil acrylic retails for $4.99 and the solvent based paint is fifty cents
less it's time to wake up.
There's nothing special about Floquil. Yeah, they mix up your
favorite railroad colors but we can find the same thing for one tenth, YES, ONE-TENTH
THE PRICE. 99 cents for a 2 ounce bottle in just about any color you want. You'll
find them under several brand names. I chose Delta Ceramcoat but they are inter-mixable
with all the others. Liquitex and Golden both manufacture preimum grades and tube
paint if you want to go that route but there's nothing wrong with the cheap ones
for painting or should I say staining our Hydrocal castings. They are simply an
inexpensive thin gel acrylic paint that should be available at your local crafts
store. I went to Micheal's here in Seattle for mine.
There's a whole rainbow of colors to choose from. Actually it's
not too hard to mix your own. there's even a science to it, starting with the
primary colors of red, yellow and blue. From them you can mix any color you want.
Half red and half yellow gives you orange and so on. Add white and black to make
them lighter or darker. But of course it is easier to buy the colors we need
per-mixed and at a buck per shot- why not?
For the stone we'll start off with a neautral base color.
So look for something that looks like the natural stone, either a light gray, tan
or whatever. Also consider your scenery. What have you chosen there? More than
likely the stones for the building were gathered locally so they should match.
We'll also highlight some of the stones with other colors mimicing those old
Flo-Stains- walnut, teak, a little mahogany.
We'll do the same thing for the brick. Orange, red, brown...
Pick a few of those.
Here are some of the colors I brought home. As mentioned
I bought the primary colors of red, yellow, blue, black and white. I picked up a
green too. I got a couple of greys for the stone. Some tans and light browns. Then
for the brick I got Tuscan red, golden brown and stuff like that. I also brought
home the standard Burnt Umber, Raw Umber, Raw Sienna and Burnt Sienna.
Now we can run some tests!

Color tests on a spare stone wall.
For the stone I started off with a grey. I thinned the
paint with water and simply brushed it on. Note that I did not seal the casting
first. We'll let the acrylic paint do that. Next I painted individual stones at
random with the highlight colors (sandstone, Payne's grey, brown (oxide red) and
toffee brown). I wisely wrote down what I was doing on the back side of the test
panel so I'll have a written record of exactly what I did. With so many colors
it's easy to get mixed up. For instance now, a month later I'm struggling to
remembewr which grey I used on the roundhouse foundation. Quaker Grey? Dolphine
Grey? Or was it Rain Grey? Well, it was one of those. The point is WRITE IT DOWN
and really it's up to you to decide what color you like most.

Start with a base coat of grey. Here I'm testing three different shades.

Highlight ome of the individual stones.

Looking pretty good.
Next step is to see if we can improve the results. The
wall looks okay at this point but I want to see if I can do better. We'll try a
wash of ink stains. Acrylic stain. How about some Builders In Scale Silverwood?
Or mortar mix? I applied some acrylic gloss medium to make the stones shineier.

Let's try some different finishing techniques.

I've wisely written down notes on the back of the test panel.

Test panel A.

Test panel B.

Test panel C.

Here I'm refining the technique that I most like.
I'm looking for something that is quick and easy, not too
complicated. If you were a real artist you could sit down and paint each stone.
But this seems to work. I decided I liked the grey base, a few random stones with
color (don't worry if they aren't precise), a gloss overcoat, then a SilverWood
wash.
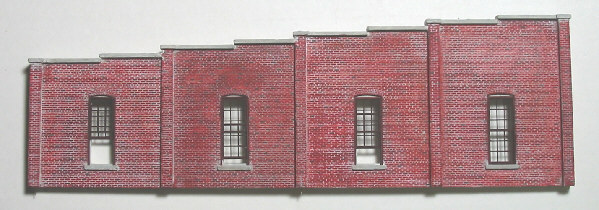
I did similar tests on the brick using various reds and
browns. Burth Sienna was my favorite.

Color tests for brick.

Color tests for brick.

Here's the one I like.
To finish them I used a thin wash of Builders In Scale
mortar mix. Initially I over-applied the mortar mix which is my custom on HO models.
However, after applying it thick to the inside walls I came to my senses and did it
very thinnly to the exterior. It's a light-grey and we don't have to fill in the
mortar lines, just accent them. Mix only a little at a time. Here I'm using a
brush. Then wipe the excess away with a paper towel and polish the surface.
So, let's review the technique:

Squirt a little paint into a mixing cup.


Add some water, be consistant.

Apply to the wall. A little streaking is okay.

Cover the whole wall.

.

side wall.

mixing the mortar

spread it out


blot and polish

finished side wall.
The saw-toothed corbels were a bit of a challange. Easy
does it and do a little at a time. The mortar mix lightens up considerably so keep
an eye on it as you proceed.

Applying mortar to the corbels.

Now, this is not the only way to do it. As I first mentioned
I've always been pleased with Floquil solvent based paints. Other brands will likely
work just as well. You may already have your favorite method down or like that of
another manyfacturer or modeling author. Glenn for instance used the same basic
techniques on his Gunnison roundhouse model but chose to do them darker, capturing
the "Black Canyon of the Gunnison". That's the thing, do what you think is right.
With the cost savings, ease of use, lack of nasty solvents-
All in all I'd say acrylics are the way to go. Though I do not recommend it I also
found cutting the finished castings is possible. More so than with the rock hard
finish of sealing and painting. I had miscalculated the corner pieces of the rear
wall and needed to trim them which I did without cursing. You really want to do the
rough work before painting and finishing.
Next section:
Building the Roof
|  O List Top